After a long winter, it takes too much guesswork and patience to wait for the last frosty night before setting out tender plans that were started under LED grow lights in the basement back in February. In past years, we often had to deploy sheets, buckets and pots to protect plants in the garden from one or more late-breaking frost events. This year, we decided to a) be more patient and b) build four cold frames for setting out early plants like radishes and cool-loving lettuces.
The cold frame design we settled on is a 2′ x 4′ x 18″ high box with a hinged lid and surrounded by the same corrugated polycarbonate that we used in The Cottage / Greenhouse project a few years ago. Available in either 2′ x 8′ or 2′ x 12′ panels from Home Depot, this clear material is impact resistant and has held up well in the garden shed. The other design criteria was for the assemblies to be light enough to move easily, so the internal frame components for all four assemblies were all made from a single 4′ x 8′ sheet of AC exterior grade plywood. A couple of coats of exterior paint will hopefully help to protect these cold frames for many seasons of use.
SunTuf corrugated polycarbonate 2′ x 8′ sheets from Home Depot
All the components for four assemblies cut from a single sheet of 3/4″ exterior plywood
The cold frames were designed around the 2′ x 8′ polycarbonate sheets for minimal waste
The final SketchUp design, after several iterations
Kreg jig for drilling pocket screw holes
A bit of production work to assemble subassemblies
Side frame subassembly
Completed subassemblies, ready for paint
Putting points of the corner pieces
Leftover SW WeatherShield put to good use
In-process painting of all the subassemblies and components before final assembly
Subassembly build ups
Assembling the first of four final cold frames
Lots of hardware to accommodate possible disassembly for easier off-season storage
Completed cold frames with polycarbonate panels attached
Four corrugated cold frames deployed to the garden and Linda planting radish seeds in the first one
A total of 32 square feet of garden soil protected
Amending the rest of the garden with organic material from the compost binost
Tilling in this season’s compost and fertilizer for the promise of another good harvest all growing season long
I’m a first cousin once removed of Dr. Harry James (Jim) Mahan. Jim was the family historian for many years, and he compiled a wealth of information about the Mahan, Campbell, Harvey, Miller and other related families. With permission from Jim’s wife, Jan, I have assumed the honors of preserving Jim’s work, making it more accessible to other family members and friends and doing updates as new information becomes available to me. Visit The Mahan Clan website for more information.
In anticipation of a trip to visit Jan and see her for literally the first time in over fifty years, I glued up some strips of ash and made her a The Mahan Clan cutting board with a stylized family tree.
Cutting the stylized family tree with on the CNC router
The 45 degree vee bit with a carbide insert cuts very cleanly
This custom design was created using VCarve Desktop
After rounding the corners and easing the edges, the cutting board is ready for finishing
Through many beautiful knitting projects, Linda’s set of rosewood knitting needles developed a couple of orphans, right in the heart of her most used needle sizes. I thought, “Gee, I have a lathe. If I can find some rosewood, how hard could it be to turn her a couple of replacements?” Well, as it turns out, it wasn’t all that hard. It wasn’t exactly easy either. I found a great source for all kinds of exotic woods right here in Michigan. Well, Bell Forest Products is in Ishpeming, Michigan … that’s in the U.P. The Upper Peninsula. “Up North.” Way up north. Anyways, they sent me a 3/8″ x 4″ x 28″ piece of E. Indian Rosewood, perfect for cutting out many knitting needle turning blanks (along with some Bubinga dowels and Sapele and E. Indian Rosewood pen blanks).
I actually turned a pair of knitting needles for Linda out of maple a while back. I remembered struggling with a lot of deflection mid-span while turning down the blanks so I decided to take the time and build a mini steady rest to help support the blanks against the cutting tool pressure. If I was going to turn a lot of slender forms, I would find some wheels with bearings, but for a small number of turnings, the nylon wheels I used have worked pretty well.
Completed mini steady rest
Turned E. Indian Rosewood blank ready for sanding to final gauge
Turned E. Indian Rosewood blank ready for sanding to final gauge
Completed mini steady rest
Mini steady rest progress with hardware
Reverse view of mini steady rest in process
Mini steady rest in process
Other exotic turning stock from Bell Forest Products
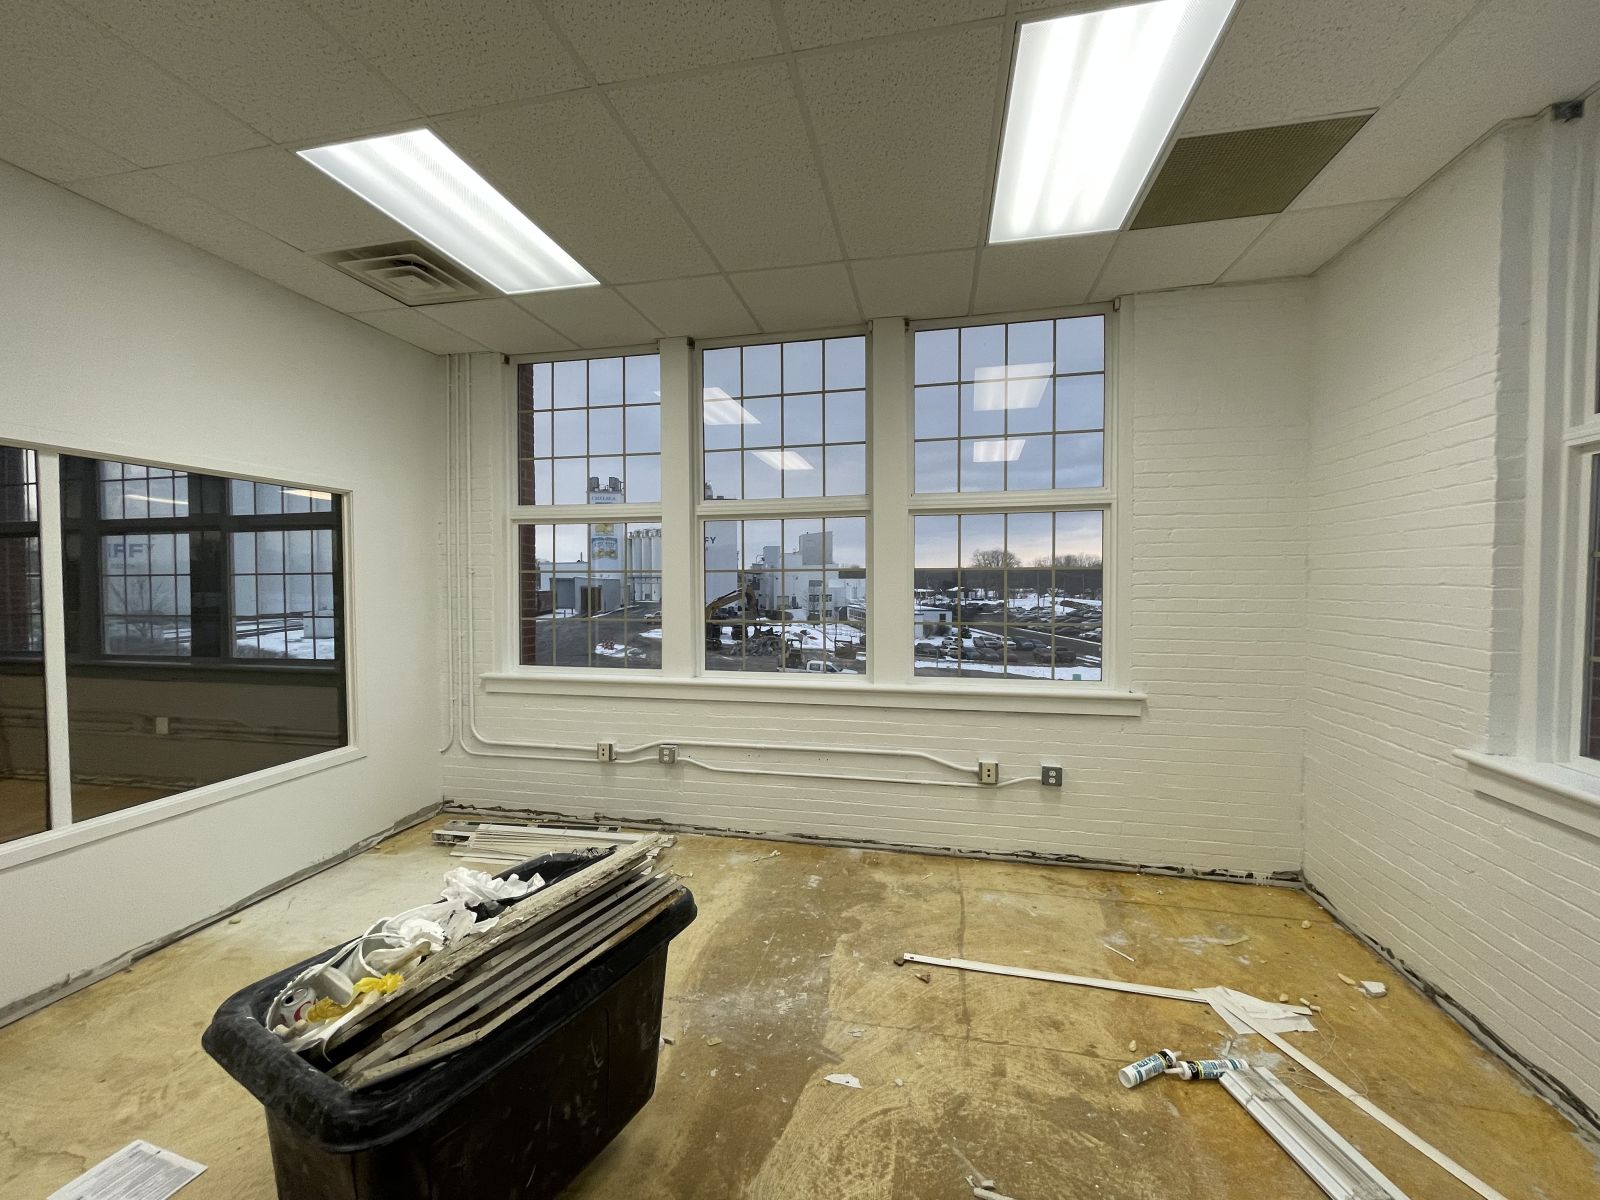
Stephen and Katie have acquired a beautiful new space for their custom jewelry business, Jewelry Set in Stone, located on the second floor of the historic Clocktower Building in Chelsea, Michigan. Once they had access to this bright, light-filled space, Stephen asked me to help him decide on some decorating and arrangement decisions. The best way I knew to help was to create a 3D model of the space in SketchUp, where we could easily try different color schemes, window dressings, furniture arrangements and other aspects of setting up the new space.
I paid a visit while the space was being prepared and took a bunch of photos and measurements. Below are some of the under renovation photos, 3D model screen shots and finally, a 3D animated walk-thru of the resulting SketchUp model. Jewelry Set in Stone has had their grand opening and the space turned out even more stunning than our model.
Contact Stephen and Katie through their website and visit this beautiful new space in person!
Hallway leading to main room (under renovation)
Main room (under renovation)
Main room (under renovation)
Private appointment room (under renovation)
View looking west at the Jiffy plant across the street
View looking north
Model of the Infinity Cube table base that Lucas made for Stephen!
Basic main room (3D model)
Private appointment room (3D model)
Main room with window treatments, rug and some furniture (3D model)
Main room with decorations and people (3D model)
Main room with decorations and a person (3D model)
Private appointment room with decorations (3D model)
A fond childhood memory was sitting at the kitchen table, usually in the wintertime, and playing game after game of Score Four. I think we only ever played by the basic rules, and as soon as someone won by getting four of their color beads in any straight row, the game was over and we’d start a new game. It was fun to strategize by having several potential rows under way, while remaining vigilant for the opponent’s plays. My favorite move was when I could maneuver the beads so that playing the next one yielded two intersecting lines of potentially four, so that the other player was forced to block one of the lines … and my next move completed the other line of four.
I’d thought about building a few sets of Score Four for quite a while, and the holdup was always finding the right beads that would closely replicate the original ones. I finally found 15 mm natural wood beads at a reasonable price and ordered enough for four sets, figuring on 40 dark and 40 light beads per set. I also ordered 1/8″ machinable brass rod to fabricate the pins from, and it was time to create a 3D model of everything else I would need to make in SketchUp.
Here’s a short clip of the engraving on my CNC router, followed by a gallery of photos documenting the whole project.
The original game
15 mm beads
CNC program for layout of main game board
Machining one of four maple main game boards
Four main game boards ready for epoxy pours
Two-part epoxy with brown colorant for highlighting game board engravings
Main game boards leveled, poured and waiting for epoxy to cure overnight
Legacy cherry cut into thin strips for bead trays
Bead tray subassemblies
Sixteen bead tray sides assembled and ready to miter and fit to main game boards
Using a flycutter on the CNC to mill off excess cured epoxy
Drilling for bead pins using the layout holes created in the CNC machining step
One main game board with all sixteen pin holes drilled
First attempt at cutting the machinable brass rod to short lengths for pins
First test pin done, but initial setup on the chopsaw bent several pieces so a better solution was needed
Getting ready to affix the new pin-cutting jig to the chopsaw base with the old painter’s tape and CA glue method
Jig for securely holding and cutting six brass rods into pin lengths
This jig took a bit of time to set up but held the pins securely with no more bent and wasted rod stock
Pins for four game sets with a few extras cut to length and ready for the next steps
Each pin was chucked in the lathe (twice) and the ends rounded off with a mill file
A complete set of cut, rounded and polished bead pins
Test fit of completed pins in one of the main game boards
Attaching the mitered bead tray sides to the main game boards with PVA glue and pin nails
First complete game board with main area and bead trays attached
Kyle was kind enough to help with the finishing one Sunday afternoon before dinner
Assembly of the last game board, highlighted by a nice beam of sunshine
A little out of order, but here is the setup for mitering the bead trays using my precision Incra miter jig on the tablesaw
Each bead pin was buffed to a high luster using fine compound on the buffing wheel
Test setup for bead finishing showed the need for a more extensive solution
Clear polyurethane finish was sprayed onto the game sets, starting with the bottom surfaces
The spray poly brought out the maple grain and natural cherry coloring
Some of the setup to attach Lazy Susan bases to each completed game board
A large Forstner bit was used as a fixture to center the rotating assemblies on the bases
Some scraps strategically cut to center the rotating assemblies on the undersides of the game boards
Top surfaces ready for their coats of polyurethane after the bottom surfaces were completely dry
The cherry in these game boards came from trees that grew on my grandparents’ home in Ohio, where my brother and his family now live
Main game boards and rotating bases ready for some final assembly
Each bead was run over an 1/8″ drill bit chucked in the lathe to clean up any burrs remaining from their manufacture
Nearly 300 beads were processed through all the steps
The Marietta Wood Works logo branded on the bottoms of the rotating bases. Any guess on the purpose of the four small holes in the bases?
Cleaned up beads ready for half to be stained dark and all to be polyurethaned
Rotating base attached to one of the main game boards (and a clue as to the purpose of the four small holes)
Another view of the rotating base
Half of the beads strung on fishing line and ready for the next processing steps
Fishing line on a makeshift uncoiling peg
Light beads strung up and getting coats of spray polyurethane
Getting ready to dunk the first batch of dark beads into a wood stain bath
The first couple of batches of dark beads stained and strung up to dry
Dunking strings of the unfinished natural wood beads into the wood stain was satisfying
The dark beads all stained and getting their clear coats
Circles of self-adhesive felt went on the rotating bases, with the center portion removed to show the MWW logo
Closeup view of the dark beads stained, clear coated and drying
Presentation / storage boxes were made from study cardboard gift boxes and carefully arranged plywood inserts
One of the game boards test fit in the storage box, showing the finger cutouts for easy removal
Separated areas under the main game board level provided storage for pins, beads and a copy of the Score Four rules and instructions
A finished game board nestled into a felt-lined storage box
The gift boxes with see-through lids were a great find at Michaels
Kyle and Linda studying the board and planning their next moves
Some of the ideas for this year’s small Christmas projects were inspired by special pieces of wood already in the shop. Other ideas came from woodworking magazines, offhand comments by others, and even a meme from the world of cryptocurrency.
Rustic Bud Vases
These pieces were made from a dried butternut bowl blank from a tree that grew in Deb and Jeff’s front yard across the street. The plastic test tube inserts were bought online, but inspired by ones that had come on the stems of individual cut flowers last year.
Slicing slabs from the bowl blank on the bandsaw – alliteration not intended 😉
Butternut slabs
Bark and cambium removed with a rotary wire brush
Drilling bud vase holes
The Marietta Wood Works brand
A few coats of spar polyurethane
Butternut is in the walnut family and has a warm brown tone and distinct annular growth rings
Each bud vase insert was custom sized
Finished Rustic Bud Vases
Turned Bud Vases
These pieces were made from thick sections of dried cherry from a tree that grew in Grandma and Grandpa Sass’s yard in my home town of Bristolville, Ohio. I decided to make them in two pieces so that I could epoxy in a 3/4″ bolt for weight near the base so they would be very stable.
Chunking out cherry turning blanks
Blanks turned round
Boring for the bolts used as counterweights
Epoxying in the bolts
Turning the final contours
The first few bud vases completed
Special chucking in the lathe for final sanding
Adding felt bottoms
Completed group of Turned Bud Vases
Polished Steel Cubes
In 2021, crypto watchers were excited about Tungsten Cubes. Why? Who knows. These “amazingly heavy” ornaments are made from aerospace grade tungsten, which you can purchase from Midwest Tungsten Services. When Kyle mentioned this odd trend, it inspired me to make him a novel gift, not out of tungsten, but out of stainless steel. I bought a 1-1/2″ x 1-1/2″ x 6″ bar of 304 stainless from McMaster-Carr for about forty bucks and went about polishing it to a mirror finish. I then enlisted Lucas and his low-speed steel cutoff saw to break the bar down to 1-1/2″ cubes. A bit of cleanup and polishing on the cut ends and Kyle got three mirror finish steel cubes!
After some trial and error, the bar was highly polished
Initial surfacing of the bar with progressively finer grits of Emery paper and water
Further polishing and buffing with various grits of buffing compound and cloth wheels
Lucas’s carbide-tooth metal cutoff saw in action
More sanding and polishing of the cut surfaces
Three highly polished stainless steel cubes
Description for three highly polished stainless steel cubes … really shiny
French Rolling Pins
The inspiration for turning a couple of French rolling pins was a comment from my brother, John. He and Linda were visiting somewhere with a gift shop and he said to me, There was a French rolling pin made from cherry and they were asking thirty-eight bucks for it!” In typical Mahan fashion, I thought, “Gee, I have lots of cherry and a lathe!” Turns out that turning these rolling pins entirely with a nice, sharp spindle roughing gouge was very straightforward. Once I made a little fixture to hold them between centers for finishing with walnut oil, completing them was easy and enjoyable, too.
This one started with a 2″ x 2″ white ash blank
Minutes later, it was round
With tapered ends and a bit of sanding, this one was ready for oiling
This quick fixture for two rolling pins made short work of finishing
Here’s a cherry blank on the lathe
I ended up with two cherry rolling pins, one without tapers on the ends
Adjusting Hammers
The idea for these maple-faced adjusting hammers came from the Tips section of a recent edition of Woodsmith Magazine. The unique feature is a 3/4″ NPT pipe tee fitting, with a handle and two faces turned and tapped to screw into it. Finding an inexpensive die on eBay made short work of these home made tools.
Some blanks roughed out of maple
I turned two faces at a time, with the trickiest part being figuring out the diameter to leave for tapping
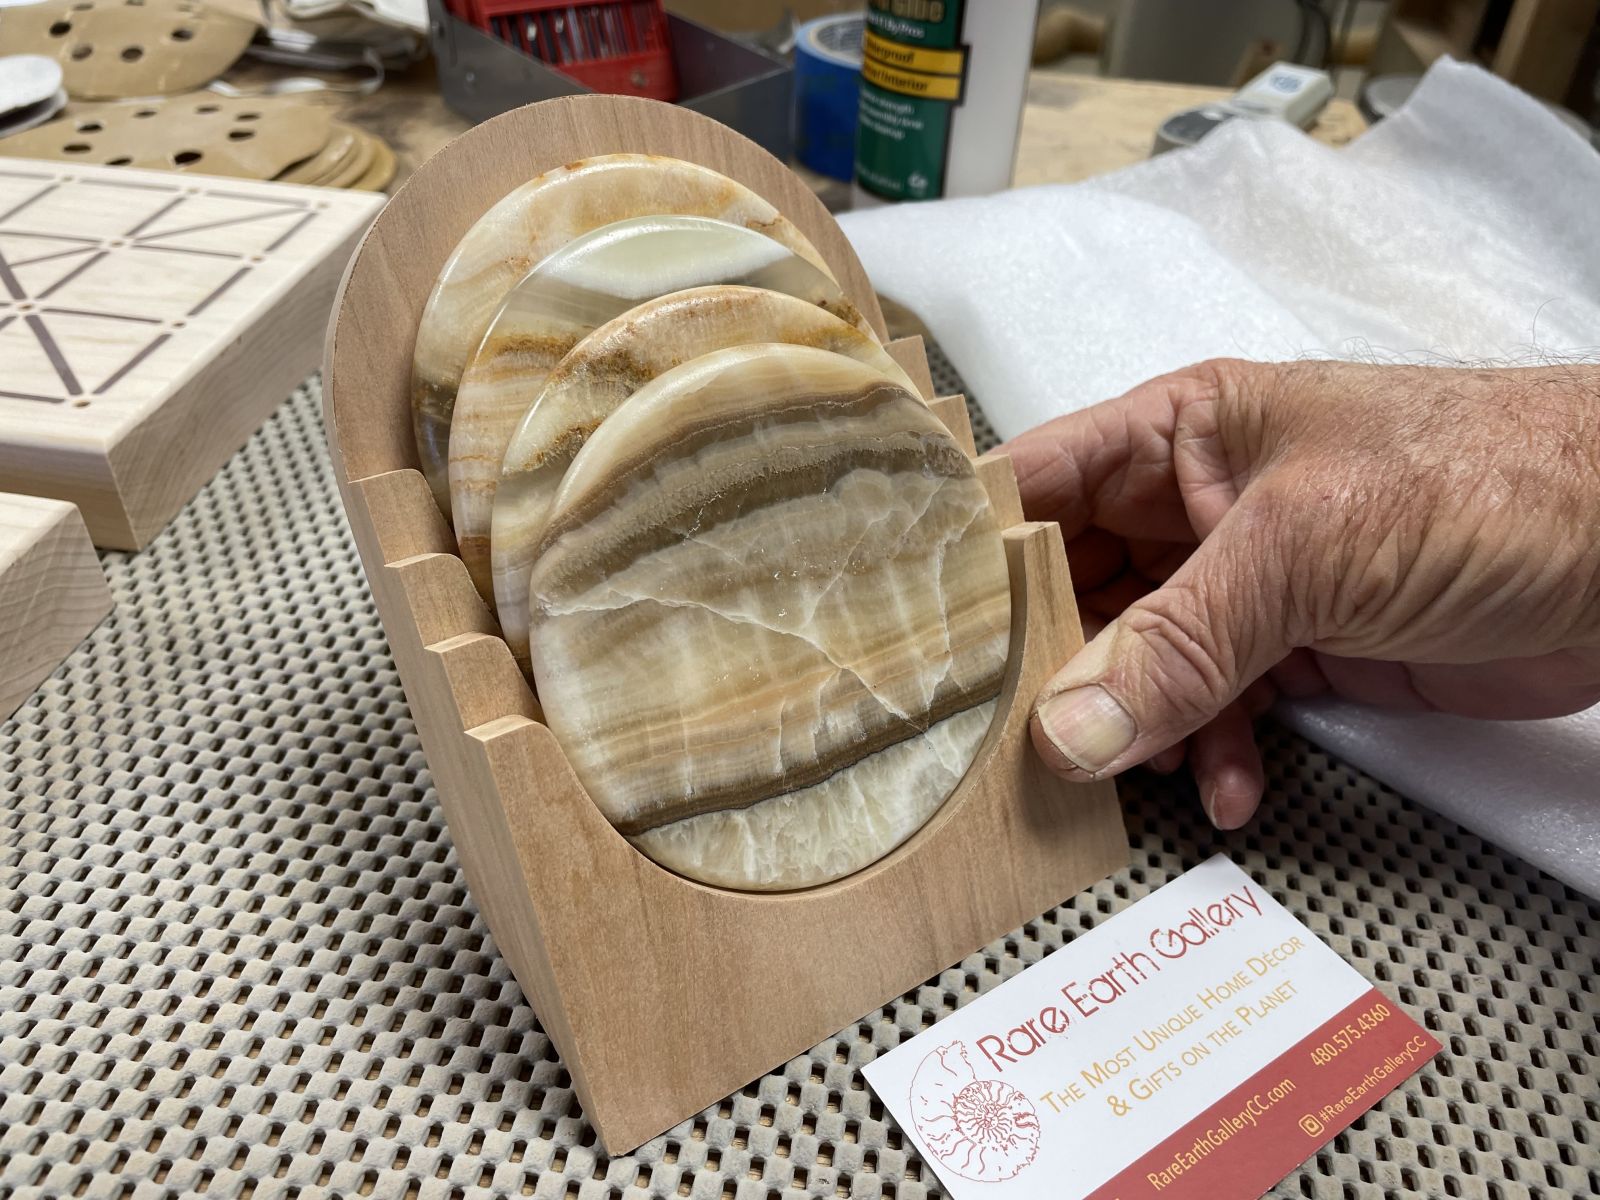
On a recent visit to Rio Verde, Arizona, Jeff and Debbie took us to the cool town of Cave Creek. The main thoroughfare is lined with unique shops, art galleries, restaurants and even a shop called The Town Dump, a quirky gift shop that, sadly, has closed after 42 years in business. Lucky for us, Rare Earth Gallery was open for business and thriving, self-described as “The world’s largest mineral and landscape home décor gallery.” Some of their statement pieces were priced near a hundred thousand dollars!
Looking for something unique, but a bit more affordable, we found a set of very unique marble (I think) coasters to take home to Kyle for a Christmas present. The store wrapped them very carefully and once they made the trip home, I set about to design and build a worthy holder to store and display this cool set of four coasters.
Laying out sections based on the actual coasters
Hand-held dry fit
Cutting a block of cherry for the angled support
Angled support roughed out
All the components ready to assemble
Assembled a layer at a time with glue and pin nails
Curing in the clamps
Front view ready for finish
A rattle can of Deft satin lacquer
Adding a felt base to the coaster holder and other small projects
The completed holder with marble coasters
From natural stone, each coaster is unique
Just for fun, here’s a two-minute video tour of Rare Earth Gallery in Cave Creek, Arizona!
Kyle brought his set of kitchen knives over to sharpen them with my diamond plate and water stones. The knives were in great shape but his original knife block was water-marked and starting to delaminate a bit. It was in the fall, so I had plenty of time to draw up a design and have a new knife block ready by Christmastime. I made a sketch and took dimensions from his existing block and knives while he was sharpening beside the sink. If he noticed me poring over his block and knives, he was kind enough not to ask any questions!
Maple seemed like a good choice for wood species, and finishing with food-safe walnut oil put a nice sheen on the finished knife block. After gluing up the main slabs, dadoed to accommodate the blades and sharpening steel, I added thin veneers of maple to hide the glue lines and then hid the veneers by rounding over the edges at the router table. As a bit of decoration, I engraved the new WÜSTHOF logo and name on the top board before glue-up, and filled the engraving with red and black two-part epoxy.
The existing knife block was starting to delaminate
The original knife block
Kyle put a keen edge on his knives with my sharpening stones
Sharpening is easy and satisfying with the right equipment and a bit of patience and perseverance
The SketchUp design and some rough 4/4 maple stock
Maple boards sized, surfaced and ready for the next steps
Keeping the boards in order when machining the dadoes was easier with some careful numbering
Setup for gluing up the paring knife block
Cooking in the clamps
Engraved top board, leveled and ready for the epoxy pour
Red and black tinted epoxy carefully administered with the help of some disposable syringes
Filled engraving, machined down with a flycutter and sanded to 400 grit
Ready for gluing up the main block
Painter’s tape helps project the Bessey parallel clamps from squeeze-out
Glued up main block with thin veneer sides added to cover the glue joints
Some creative clamping to assemble the angled paring knife block to the main block
With all corners rounded off and everything sanded, it was time for the first application of walnut oil
The heat-treated walnut oil from wood turner Mike Mahoney leaves a beautiful. food-safe sheen and really brought out the epoxy inlays
Side view of the finished knife block
The finished knife block staged with some of my kitchen knives
Front view of the staged knife block
Happily, all of Kyle’s knives and sharpening steel fit nicely into his new knife block
Nevis, one of our young neighborhood friends, asked me if I would help him build a Murphy Desk to hang on the wall in his room. Of course, I said yes immediately. Doing joint projects in the workshop is one of my favorite things to do, and passing along a bit of passion and knowledge for woodworking to a member of an upcoming generation is in keeping with an honored tradition within the skilled trades.
A budding and creative artist himself, Nevis sketched out his vision for the desk he wanted and we worked together on creating a 3D model in SketchUp, making changes and tweaks to the design as we progressed. Once we had shop drawings, we knew there was plenty of leftover birch plywood and maple in my shop to complete the project. We were particularly interested to see how the cool self-closing drop leaf hinges I had found were going to work.
Once the desk was completed, Nevis and his dad mounted it on a French cleat and we set about producing a few desk accessories that Nevis had also envisioned. One was a paper holder for the artisan pulp paper that Nevis had learned to make, one was a pen holder for his new set of colored pens, and the final piece was another pen holder to display some of his special pens.
Nevis and me, working out the details of his concept in 3D
Special self-closing drop leaf desk hardware
Leftover plywood
Shop drawings from final SketchUp 3D model
Nevis labeling plywood components
First dry fit of main carcass assembly
Gluing up the main carcass assembly
Adding screws for more strength
Adding the sides with right angle blocks
Reinforcing more of the plywood joinery
Glue and brad nails attach the hardwood trim
Drawer components cut and ready
‘Face pareidolia’ – the phenomenon of seeing faces in everyday objects – is a very human condition that relates to how our brains are wired. (This is a jig for the desk hinge mortises.)
Using the oscillating drum sander to smooth the drawer front cut-outs
Drawer assembly day
We build secret compartments into the bottoms of each drawer
Hidden rare earth magnets were glued in to help open the false bottoms
Gluing up the drop leaf assembly
Mocking up the desk carcass and drop leaf
Setup for mortising the drop leaf hinges
Nevis used a mortising bit with a top bearing follower in the jig
Clean as you go
This jig ended up supporting two sizes of drop leaf hinges
The filler strip the hinges attached to will be permanently mounted in the main desk carcass assembly
A self-centering VIX bit locates hinge pilot holes
Finishing with MinWax Water Borne Oil Modified Polyurethane
Lots of surfaces to finish
First coat on all the components
Finished desk – closed
Finished desk – open
Finished desk – cat
Some of the desk accessories in progess
Beveling the pen and pencil holder after assembly
Finishing the accessories
Block of cherry for the special pen display holder
Nevis laying out the hole pattern
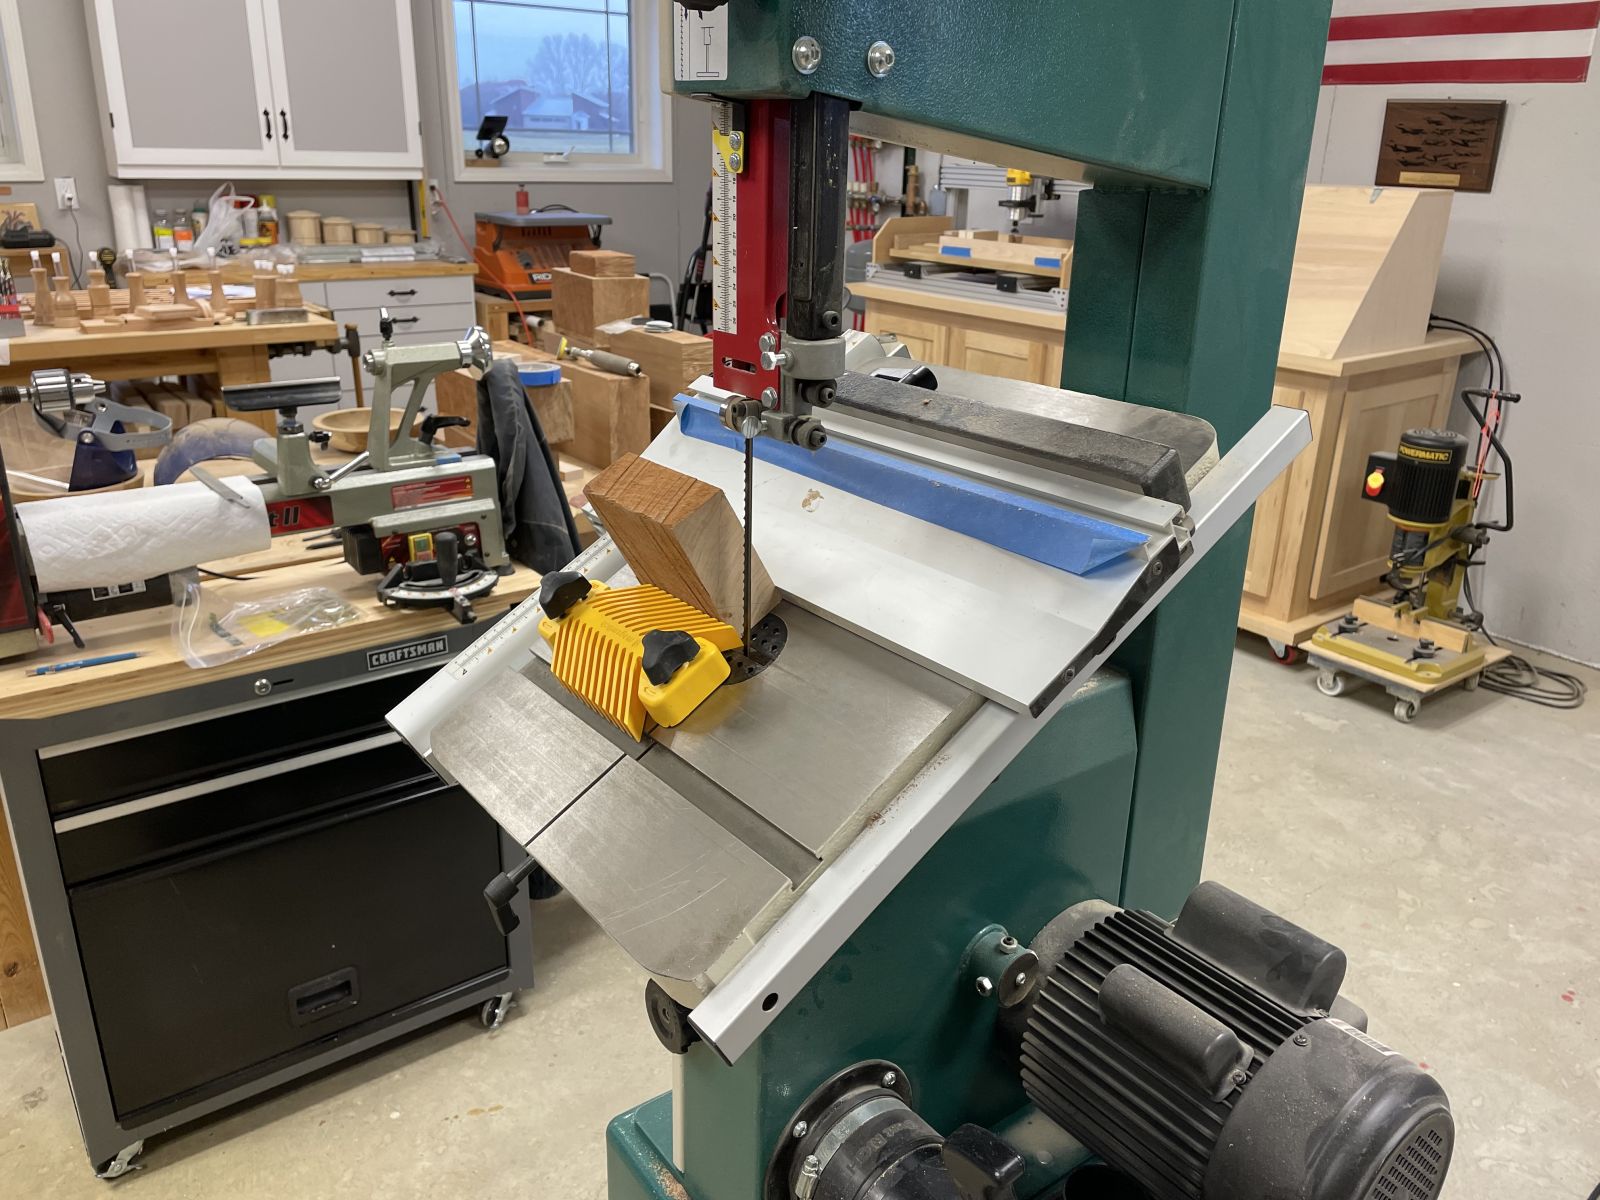
Drilling the hole pattern in the round blank before beveling on the bandsaw
Finished special pen holder
Finished special pen holder with a few writing instruments
Every since my buddy Al put a Langmuir Crossfire Pro CNC plasma cutter in his shop, we’ve talked about doing a joint metal / wood project. A wonderful reunion of three couples, all lifelong friends, finally presented the perfect opportunity to make commemorative plaques a joint project. Starting in Al’s shop, we cut out mountain scenes with an alpine lake in the foreground out of 16 ga. sheet metal. Taking the digital file we had created in Inkscape, along with the metal scenes back to my shop, the process continued on my Openbuilds CNC router. After gluing up and carving three 10 inch x 18 inch plaque blanks, two-part epoxy pours added color. Once the epoxy cured and was sanded, a couple of coats of Minwax Water Based Oil Modified polyurethane sealed the plaques. Finally, the metal scenes were permanently affixed in their pockets with 4400 psi 5-minute epoxy.
Setting up Al’s CNC plasma cutter
The first cut out mountain scene
Sparks fly as the white-hot plasma burns through metal
PPE all around
CNC plasma cutter control software
Some initial cleanup with an abrasive disc
More cleanup with another angle grinder
Mill scale is stubborn
First test cut on the CNC router
The original profile was offset out 1/16 inch
A home made bending roll helped straighten the sheet metal that was slightly warped from the intense heat of the CNC plasma cutter
White ash boards ready for glue up
Edge glued with Titebond III
And clamped in parallel clamps
First bit of engraving with a 60 degree vee bit
Pocketing some areas with a 1/4 inch up cutting end mill
More detailed vee carving
Carved plaques ready for the last few steps
Sealing end grain in the carved areas with dewaxed shellac to prevent the colored epoxy from bleeding too much
Ready to mix and pour two-part epoxy tinted several different colors
Disposable syringes help to deposit the epoxy more accurately than pouring
Blue for the alpine lake and white for snow on the mountians
All epoxy colors poured and finishing after a 24-hour curing time
The Marietta Wood Works branding iron
Adding the MWW brand on the back of the plaques
Sanded and ready for polyurethane
Epoxying in the metal mountain scenes
Painters points helped hold the metal mountin scenes flat while the 5-minute epoxy cured
One of three finished plaques commemorating good friends exploring mountains and alpine lakes together!


")
")

")
")
")

")


")
")
")
")
")
")


 and the ends rounded off with a mill file")


")


")


")