Katie asked me if I could make two little stools, based on the one she already had. She also pointed me to a plan for them online. As always, well almost always, I created a 3D model of the stool from the plan, along with a few corrections and “improvements.” From the SketchUp model, I also produced dimensioned drawings and a full sized template for the stool sides. Conveniently, the template fit on a single sheet of paper.
After building the first two with square, mortised stretchers between the sides, I updated my SketchUp design to use round dowels for stretchers. This simplified construction, which came in handy when I learned that Megan might like one, too! So I made another one for Megan, and one for Makayla at the same time.
From the big smiles on the little ones’ faces as they sat on these kid-sized stools, I bet more of them will be coming out of the Marietta Wood Works workshop!
Some maple boards from the inventory in the barn
Roughing out a full size pattern for the sides from the printed template
Cutting blanks for enough sides to make the first two stools
Roughing out the sides on the bandsaw
A couple of strips of XFasten woodworking double-sided tape (thanks again, Emily and Lucas!) stuck the pattern to each blank for refining with a flush trim bit on the router table
Mortising square holes for the square stretchers of the initial design
Two pair of sides mortised and ready for the next steps
All edges were eased with an 1/8″ roundover bit on the router table
Dry fit of the sides and stretchers
Two pair of sides and stretchers assembled
Test fitting the setup for the seat slats
Cutting half laps on the seat slats using a tenoning jig on the tablesaw
Seat slats spaced evenly and holes transferred to the sides
Two stool subassemblies ready for backs
Roughing the full radius on the back arms that will be refined on the oscillating belt sander
One of the fussiest parts of this build was fitting the back subassembly to the seat subassembly without gaps
A piece of plywood temporarily clamped to the back arms assisted with positioning the back properly for drilling
The first two Katie’s Little Stools, done and ready for the little ones
Heating up the Marietta Wood Works branding iron
The MWW brand on the bottom of one of the seat slats
Updated design with round dowel stretchers
One pair of sides and stretchers assembled
Counterboring with a Forstner bit for the round stretchers was a lot quicker than setting up the dedicated mortiser
Two seat subassemblies ready for backs
The second pair of Katie’s Little Stools to come out of the Marietta Wood Works workshop
Inspired by the walnut inlaid amplifier that Kyle made for Beth for last year’s Christmas name exchange, I decided to make a simplified design, taking advantage of the lessons learned from Kyle’s build. I also took advantage of a piece of 2″ thick white ash left over from Kyle’s Platform Bed build.
One of the lessons was the difficulty of holding all the pieces in perfect alignment for the final glue-up, so I incorporated 1/8″ dowels at the glue joint interfaces, using holes drilled before the side pieces were cut away on the bandsaw. The dowels just had to be strategically placed so they ended up in the sections left after the internal sound chamber was sawed away. Plus … who knew you can buy 1/8″ dowels at the local Ace Hardware?? Instead of filling in the dowel holes on the outside of the amplifier, I decided to leave them as a “feature.”
With a few coats of MinWax Water Based Oil Modified Polyurethane and a little branding iron work, these amplifiers came out looking good and they really pump up the volume when a smartphone is inserted!
Cross-cutting blanks from a 2″ thick white ash board
Blanks ready to square up
Drilling strategically placed 1/8″ dowel holes before the sides of the blanks are removed
Removing the sides in preparation for bandsawing the internal features
Removed sides showing how the pre-drilled dowel holes span across the future glue joint
Preparing the paper templates for application to the center portion of the blanks
Bits of painter’s tape to prevent the spray adhesive from fouling the dowel holes
3M Super 77 spray adhesive works great for adhering full scale paper templates
A 1’4″ 6 TPI hook tooth bandsaw blade will help with sawing around tight radii
The left and top right pieces with dowel hole positions indicated will be glued back between the removed sides
All the pieces, including waste, were carefully kept in order so the grain patterns matched on glue-up
The oscillating drum sander drum was just tall enough to sand the bandsawn pieces in one pass
A little acetone helped remove the paper templates and any remaining spray adhesive
After some trial and error, a quick little jig to cut short pieces of the 1/8″ dowel with a razor knife worked the best
Sanding a tiny radius on the ends of the 1/8″ dowels made inserting them much easier
A bit of dry fitting with the dowels showed that the glue joints were going to line up nicely
More dry fitting
Final dry fit of all the pieces. The bottom wasn’t doweled, as it didn’t have to line up perfectly
Transferring the internal profiles to the side pieces to facilitate finishing the internal cavity before final glue-up
A small artist’s brush made coloring between the lines pretty easy
Internal cavity surfaces finished and ready for final glue-up
Titebond III PVA carefully applied to avoid too much squeeze out to clean up
Y’all know what Norm says …
After cooking the clamps overnight, these squares will be ready to make the rounds
Laying out the final circle shape on the bottom surface, so the center mark won’t be too obvious
The circles were cut out freehand, staying just outside the layout line
After sanding the outside surfaces on the oscillating belt sander, an 1/8″ radius was added to the top and bottom on the router table
The Marietta Wood Works brands on the bottoms helped to hide the center point dimple from laying out the circles
More water-based poly on the outside surfaces brought out the attractive white ash grain
Four finished Smartphone Amplifiers
The glue joints practically disappeared on the final products!
Two things: I love wood with a story, and if you give me wood, you can almost always expect to get some of it back in a different form. One of Jeff’s customers requested Vertical Grain Douglas Fir (VGDF) for window parts, a species he hadn’t processed in the past. He gave me a few boards to play with and I decided to make him a piece that could sit on his desk as a representative sample of this new product.
A box is a common woodworking project to use a small amount of an interesting species, and to try out different joinery techniques. Box or finger joints have been around for a long time and make a really strong joint because of the large amount of gluing surface the fingers provide. I decided on a sliding lid to keep this box design simple, incorporating the 1/4″ spacing of the fingers. A tiny piece of walnut made a contrasting pull on the lid. A few coats of tung oil really brought out the beauty of the Doug Fir, and highlighted the end grain of the alternating finger joints, as well.
Note: Machining VGDF proved a little tricky, as the grain structure and orientation makes cross cuts quite spintery. Some painters tape for the cross cuts and a backer board for the finger cuts kept splintering to a minimum.
Resawing a Vertical Grain Douglas Fir board
Planing the resawn pieces to a smooth, uniform thickness
Painter’s tape helped reduce splintering on cross cuts
This quick box joint jig was set up for 1/4″ fingers and clamped to my Incra miter gage
My dial indicator and mag base allowed me to make adjustments to my jig a few thousandths at a time
The third try on my setup pieces yielded a fit that was close enough for who it was for …
Four sides with fingers cut, and showing the spintery nature of VGDF
With grooves ploughed for the sliding lid and box bottom, a tuned in the finger fit with a little hand sanding
First dry fit of the whole box and lid looked good
Marietta Wood Works brand on the bottom of the bottom
Lots of surfaces to get glue spread on in a timely manner
A “gravity clamp” on the walnut lid pull, attached with a few drops of CA glue
Y’all know what Norm always said …
Box joint fingers should be left proud to allow for sanding them flush … just not this proud
Six tiny plugs were glued in to close the holes left by ploughing the lid and bottom grooves
Tung oil brought out the beautify of the grain and highlighted the box joint finger end grain
Finished product with the MWW logo branded on the bottom … with a slightly too hot branding iron
With an upcoming wedding in the family, Ruthann asked if I would cut some logs from trees that came down on their property into discs to use as table decorations for the wedding reception. When I learned that the diameter of the larger logs would fit on my bandsaw, I agreed to the project.
With a little trial and error (and one bent bandsaw blade), I found that attaching a carrier board to each log was needed to prevent the log from rolling or twisting under the cutting forces. I also found that the logs still had a high moisture content, so a bit of drying time was needed once the discs were cut to their one inch final thickness.
After cleaning up any loose bark and applying a couple of coats of tung oil, about 35 large and 35 small discs were ready for the celebration.
After one trial cut by hand with a pruning saw …
… it was obvious that the bandsaw was the right tool for this job
The first cut revealed spalting that would add a lot of character to the finished discs
Attaching a carrier board to the uneven surface of each log was going to take a fair amount of time, effort and shims
The shortcut of not attaching a carrier board immediately proved to be unworkable
First few of the larger discs cut, all showing interesting spalting patterns
After just a short while on the workbench, I noticed a lot of moisture wicking out of the cut logs
Three painters points under each disc allowed air circulation on all sides, speeding up the drying process
The moisture meter confirmed what was already apparent … the logs were very green and wet
More large discs cut and drying, along with a crotch section that might be interesting with a little work
Smaller logs of a different species were going to yield discs with bark intact and a beautiful end grain pattern
A bunch of small discs
Small discs on scrap wood shop made drying racks
Hmm … could these logs have been an apple tree??
Some larger logs had to be chainsawn down to a size I could manage on the bandsaw
Using the 8″ jointer, I added a small flattened section to some of the bigger logs, to provide a stable place to attach the carrier boards
Shop overview with this project in full swing … and the ubiquitous cup of shop coffee
All discs cut and on standoffs for some drying time
Small discs drying
A test application of Mahoney’s walnut oil revealed beautiful end grain patterns
Wire brush cleanup of the discs that didn’t hold on to their bark
I decided to switch to sprayed on tung oil to speed up the finishing process
Ruthann came by to help with the finishing
Finished discs drying on the standoffs
Small discs after finishing
Packing the discs up for delivery
Bark, sapwood, heartwood and end grain brought out by a spritz of tung oil
After forty-some years in the family, an unfortunate encounter with the vacuum cleaner left Eddie without his hammer … and without his arm! Our friend Chris and her husband found Eddie on a Caribbean beach on the last day of their honeymoon. Eddie’s creator told them that he used shoe polish as a finish after he had carved Eddie.
The biggest challenge to this type of repair is coming up with a method to clamp the pieces back together while the glue is curing. Several elastic hair bands proved to be the ideal clamping solution for Eddie’s predicament.
Eddie the One-Armed Blacksmith was looking a little sad on the day he arrived in my workshop
Eddie’s hammer … and hand … a really clean fracture with no missing pieces made this repair relatively straightforward
The arm and hammer had two attachment points, one on the arm and one on the shoulder
I used a tiny rasp in the Dremel to add a few grooves it the fracture plane to give the adhesive more “bite”
Grooves on the other side of the repair
The JB Weld 4400 PSI two-part five-minute epoxy is the strongest adhesive I have ever used
Uniform squeeze out indicated a consistent layer of epoxy between the two pieces
Existing lines on Eddie’s arm made the repair joint look like it had always been there
Eddie the Blacksmith was back in business
It might just be me, but I think he looks a lot happier now
Some of the carving details
Eddie’s anvil and tongs, where he might have been making a spoon or a small shovel
Eddie the Blacksmith preparing for his next well-placed hammer strike
The seven blueberry bushes on the east end of our garden had outgrown the individual cages we had built to protect our berries from the hungry little birdies that we enjoy seeing in the back yard. We feed them plenty of seed and suet to be okay with not sharing our precious blueberries with them!
Linda and I brainstormed and sketched out several different solutions, finally settling on the idea to incorporate the existing garden fence into an enclosure around the entire blueberry patch. We already had heavy gauge horsewire around the apple trees that could be re-purposed to support the netting needed to keep out Tweety and family. (We kept the apple trees protected from the deer with a lighter gauge horsewire that was a lot easier to work with.)
A few new seven-foot green fence posts and a dozen pressure treated 2x4s, along with a bit of netting, screening and some ash and maple out of my stock in the barn and Linda and I were off to the races. It’s a real pleasure to be able to walk into the enclosure and pick berries in our own well-protected blueberry patch!
Setting seven-foot fence posts
Top and bottom rails for new fence section
New fence section framing completed
Trusty pocket screws for 1-1/2 inch material
Adding new top rails at five feet all around
Top rails and new fence section complete
Four foot by twenty-four foot panels of heavy gauge horsewire – two down, two to go
Contemplating the finished fortress
Horsewire panels in place but not holding a nice arch like we had hoped
Long strips of white ash will add shape and structural support to the horsewire arch
Stop blocks to hold white ash arch strips
Before shot with arch strips ready to install
Five white ash arch strips did the trick
Good progress on the fortress with several steps yet to be completed
Field dimensions for the entryway framing
Entryway framing taking shape – more pocket screws
Entryway door frame will inform the required screen door dimensions
Entryway framing for a screen door and also supports the outward load from the white ash arch strips
This project is on the level 😉
Main garden gate and fortress screen door line up by design
Inside view of entryway framing showing two four-foot fence post supports
SketchUp design for screen door made of maple from lumber in the barn
Pocket screw construction for screen door, too
Screen door assembly – note the grooves for mesh screen and splines
Carefully marking the end cuts for the lower cross bracing
Half lap joint for the middle of the lower cross bracing
Lower cross bracing cut and fit nicely, then secured with glue and screws in the corners
Bird netting going over the heavy gauge horsewire, attached with nylon zip ties
The whole reason for this project – budding blueberries – and just in time!
One of the bigger blueberry bushes in the fortress
A protective coat of Sherwin-Williams exterior latex left over from a previous project
Testing the structural strength (and maybe showing off those guns a bit, too!)
Lots of fine work attaching bird netting over the entire fortress structure
Finished custom screen door ready for mesh screen installation
I was pretty sure I had a screen spline tool from a long time ago – it just took me a while to find it
Lower mesh screen installed – my spline groove was a little tight and needed lots of pressure to roll the spline in
Screen door with spring-loaded hinges and handle mounted – ready for installation
Another shot of the completed screen door
Linda experiencing the newly created space for protecting our blueberry crops
The Blueberry Fortress
View from inside the fortress – it’s so nice to have the blueberry bushes protected and so easy to access!
The time had come to update the computer and its setup in my home office. A long overdue addition of RAM took my aging HP Pavilion tower from 8GB to 32GB and drastically improved its performance. Lesson learned and passed on. I was also having a little trouble seeing my dual monitor setup on their VariDesk standing desk converter, which placed the monitors at least three feet away. And to top off my list of complaints, the VariDesk base on the fixed height desk raised my keyboard a bit too high for comfortable typing.
After a lot of research and watching standing desk reviews, I settled on buying the highly rated UPLIFT DESK V2 Commercial T-style base and building my own table top to attach to it. With a motor in each three-stage telescoping leg, this particular base has a lifting capacity of over 350 pounds and about 24 inches of travel, up to a maximum of about 48 inches off the floor. When doing wire management (last few photos below), I could practically walk under the desk at its maximum height!
After a few weeks of use, I am very satisfied with my new UPLIFT DESK standing desk. I bought one of the upgraded controllers that saves up to four programmable heights, so going from my personal sitting height to my standing height at the touch of a button takes about ten seconds or so. At both heights, the desk is solid, with no monitor shake when I am banging away on the keyboard. The ease of switching between standing and sitting makes going between those two postures several times a day both healthy and a real pleasure!
The UPLIFT base components arrived in three well packaged boxes
The 1-1/2 x 30 x 76 desk top is made up from two sheets of birch plywood
Positioning the base for pre-drilling for fasteners
The base components are beefy and arrived well organized
Some of the base controls and wiring
Trimming the ends square after glue up
The desk top was finished with 3/4 maple banding
Three coats of MinWax Oil Modified Polyurethane provide a durable satin finish to the birch plywood
Desk top ready for assembly
The previous setup with the 36 inch VariDesk convertible standing desk on cabinetry that was made for the home office in Georgia
Previous tower and UPS arrangement
This oak plywood cabinetry has made many moves over the years
Final assembly of the base to the table top upside down
Half way to upright
In place at the lowest position about 25 inches to the desk top
UPLIFT controller with four memory positions
In place at the highest position with the desk top about 48 inches
New dual monitor setup with two HP 22 inch monitors that I already had in other areas
The final arrangement with the monitors on custom risers and the desk in the standing position (wire management not completed yet)
Custom wire management panel will be attached to the back underside of the desk top with screws
Using rings cut from 1-1/2 PVC pipe was an idea inspired by a wire management video on YouTube
Wire management panel mounted
Wires, power strip and power adapters neatly arranged with Velcro
As Lucas and Emily renovate the Alaya, they have had to fabricate many unique or no longer available parts. To rebuild their motorized anchor windlass, new gaskets were needed. Lucas measured and modeled the main and motor seal gaskets he needed and sent the files to me. I imported his files into SketchUp and then into V-Carve Desktop to generate the G code files needed to drive my CNC router. The video below is a CNC simulation from V-Carve.
Lucas drop shipped a couple of rolls of KARROPAK Tan Fiber Sheet gasket material to me. The challenge became figuring out a way to hold the uncoiled sheet flat on the CNC bed. I used a combination of Oramask 813 stencil film and XFasten Double Sided Woodworking Tape as seen in the gallery below.
Two rolls of KARROPAK Tan Fiber Sheet Part No. 3046
Testing Oramask 813 as a release layer between the CNC bed and the XFasten double-sided tape
Full sheet of Oramask 813 over the gasket material
Nearly 100% coverage with XFasten double-sided tape to hold the whole sheet of gasket material as flat as possible
Ready to apply to the pre-prepared carrier board of MDF
Carrier board with offsets for CNC marked out
Gasket material sheet adhered to carrier board of MDF
Carrier board clamped into the locator and the CNC all zeroed out and ready to go
UCCNC software controller with the motor seal G code loaded
First set cut with a 45 degree carbide insert V bit set a little too low and adhesive from the double-sided tape pulled up
The gasket material released nicely from the light adhesive on the Oramask 813
Ready to release the actual gaskets with really thin sections that turned out to be pretty durable
First set of gaskets released and ready for a lot of gentle fuzz removal
Cutting the second set of gaskets with the depth of cut reduced to avoid pulling up adhesive
Second set of gaskets came out much cleaner
Carefully prying up the thin main gasket with a razor knife blade
Two sets of anchor windlass gaskets ready for a test fitting
Heat applied with an old iron seemed to help take the coiled memory out of the gasket material
First test fit on the windlass housing looked pretty good!
The video below shows the first attempt at cutting out a custom gasket on my CNC router. The pass shown was just a little too deep and brought up some adhesive from the double-sided tape I used to hold the gasket material flat. A second try with a little less cutting depth resulted in a cleaner cut with less fuzziness to contend with.
If I were going to do a lot of gaskets on my CNC router, a drag knife and vacuum table would probably be good upgrades!
I use a Craftsman roll around tool chest base for my NOVA Comet II midi lathe. The two drawers in the cabinet conveniently hold many of the accessories and supplies I use while turning pens, bowls, etc., on the lathe. The lower part of the cabinet is a big, empty space that was inefficient for storing and accessing pretty much anything. The idea came to use a bit of scrap plywood and build a little chest-of-drawers insert that would slip into the empty space and provide storage for more of the many small bits and pieces associated with the midi lathe.
Not wanting to take up space (or pay for) with drawer slides, I designed the top three drawers with Masonite bottoms that extended about a 1/4 inch on each side. With a little paraffin wax, these bottom extensions slide easily in carefully spaced dadoes in the sides of the cabinet. The bottom drawer just sits in the lower opening of the cabinet and provides a little room for storing bigger pieces that aren’t too heavy.
I had eight spare drawer pulls on hand, but they weren’t all the same … so I splurged on matching pulls for about eighty cents apiece! 😉
Empty metal cabinet space full of organizational promise!
NOVA Comet II midi lathe on its Craftsman roll around cabinet base
Inefficient storage area in the bottom of the roll around Craftsman cabinet
Cabinet carcass from finished oak plywood salvaged from disassembled office cabinetry
Cabinet carcass assembled
It fits!
Drawers with temporary screw pulls
Closeup of my new under lathe drawer cabinet
Completed lathe cabinet with lots of drawer storage to organize small accessories and supplies
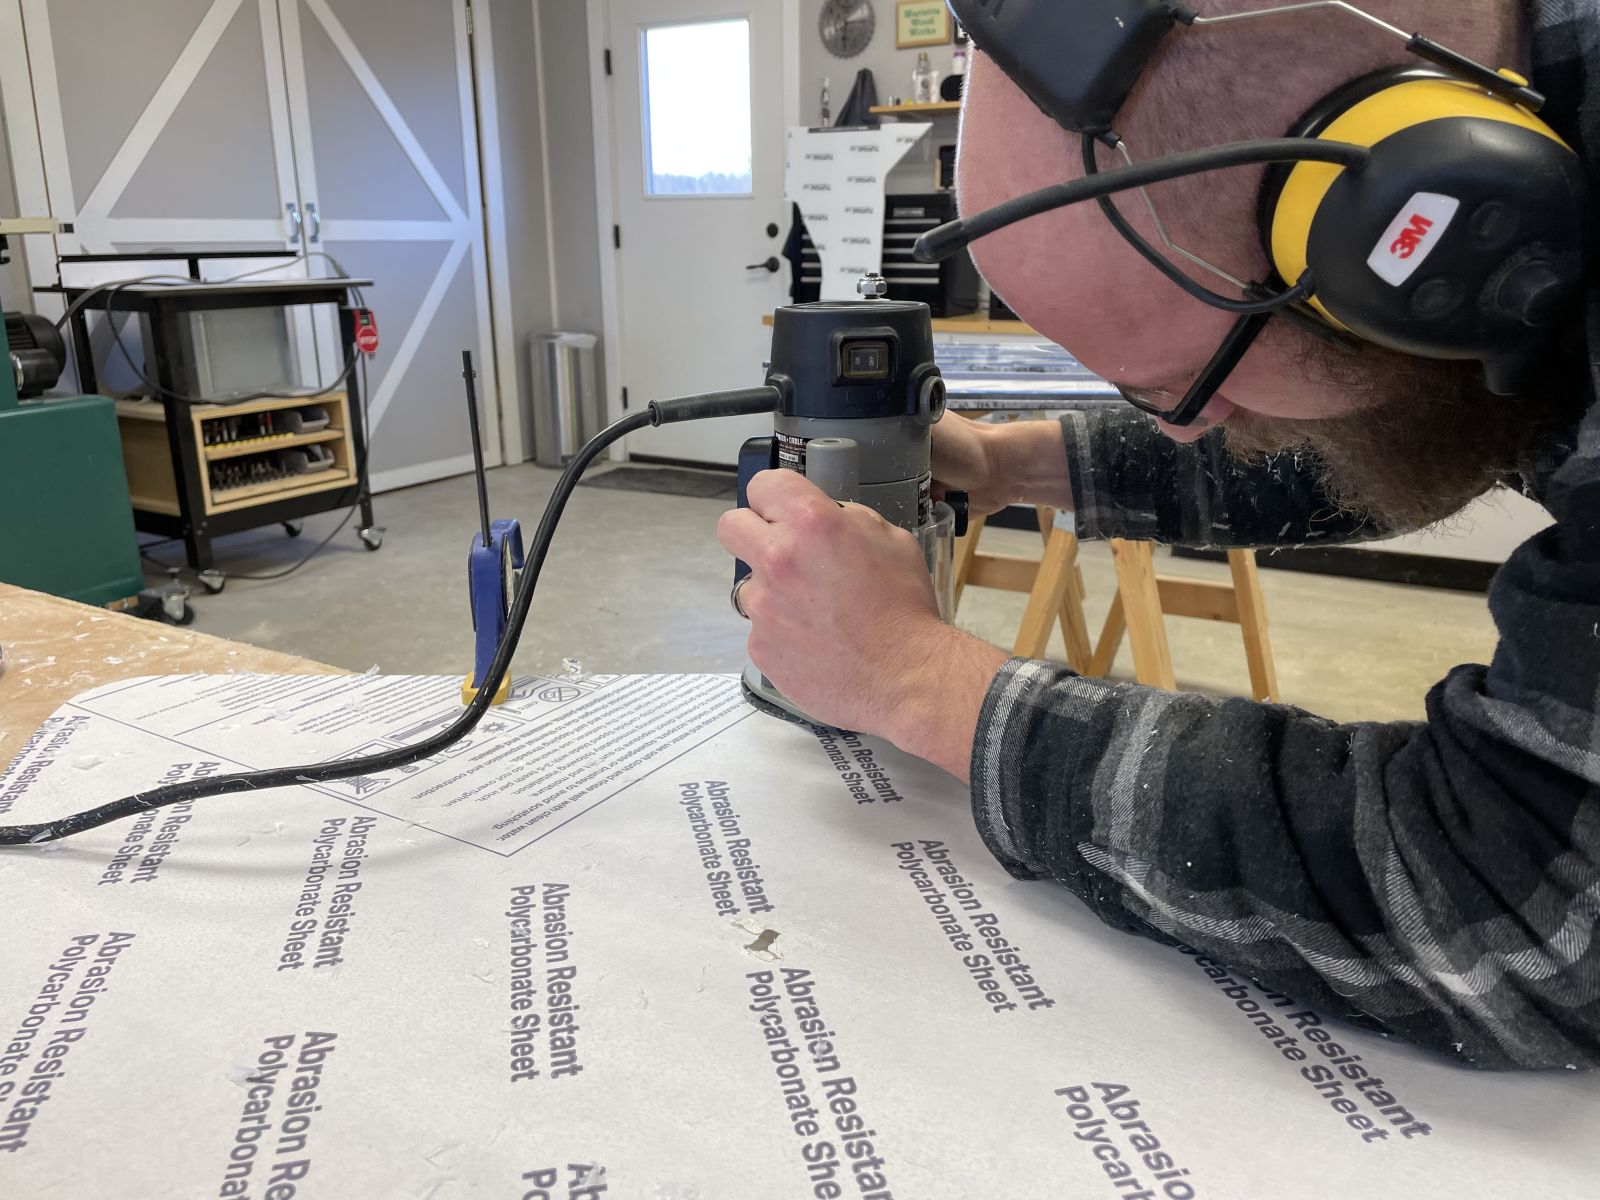
One of the major projects that Lucas and Emily have undertaken in the restoration of their sailboat, the Alaya, is replacing all of the windows. The challenge was coming up with an efficient way to accurately duplicate the original, hand-fit windows in 1/2″ polycarbonate. With hands on experience and a lot of brainstorming, our process evolved:
Trace the original windows, make plywood templates, attach templates to new material with the “painter’s tape and CA glue” trick, cut the new window with several incremental passes with a flush trim router bit
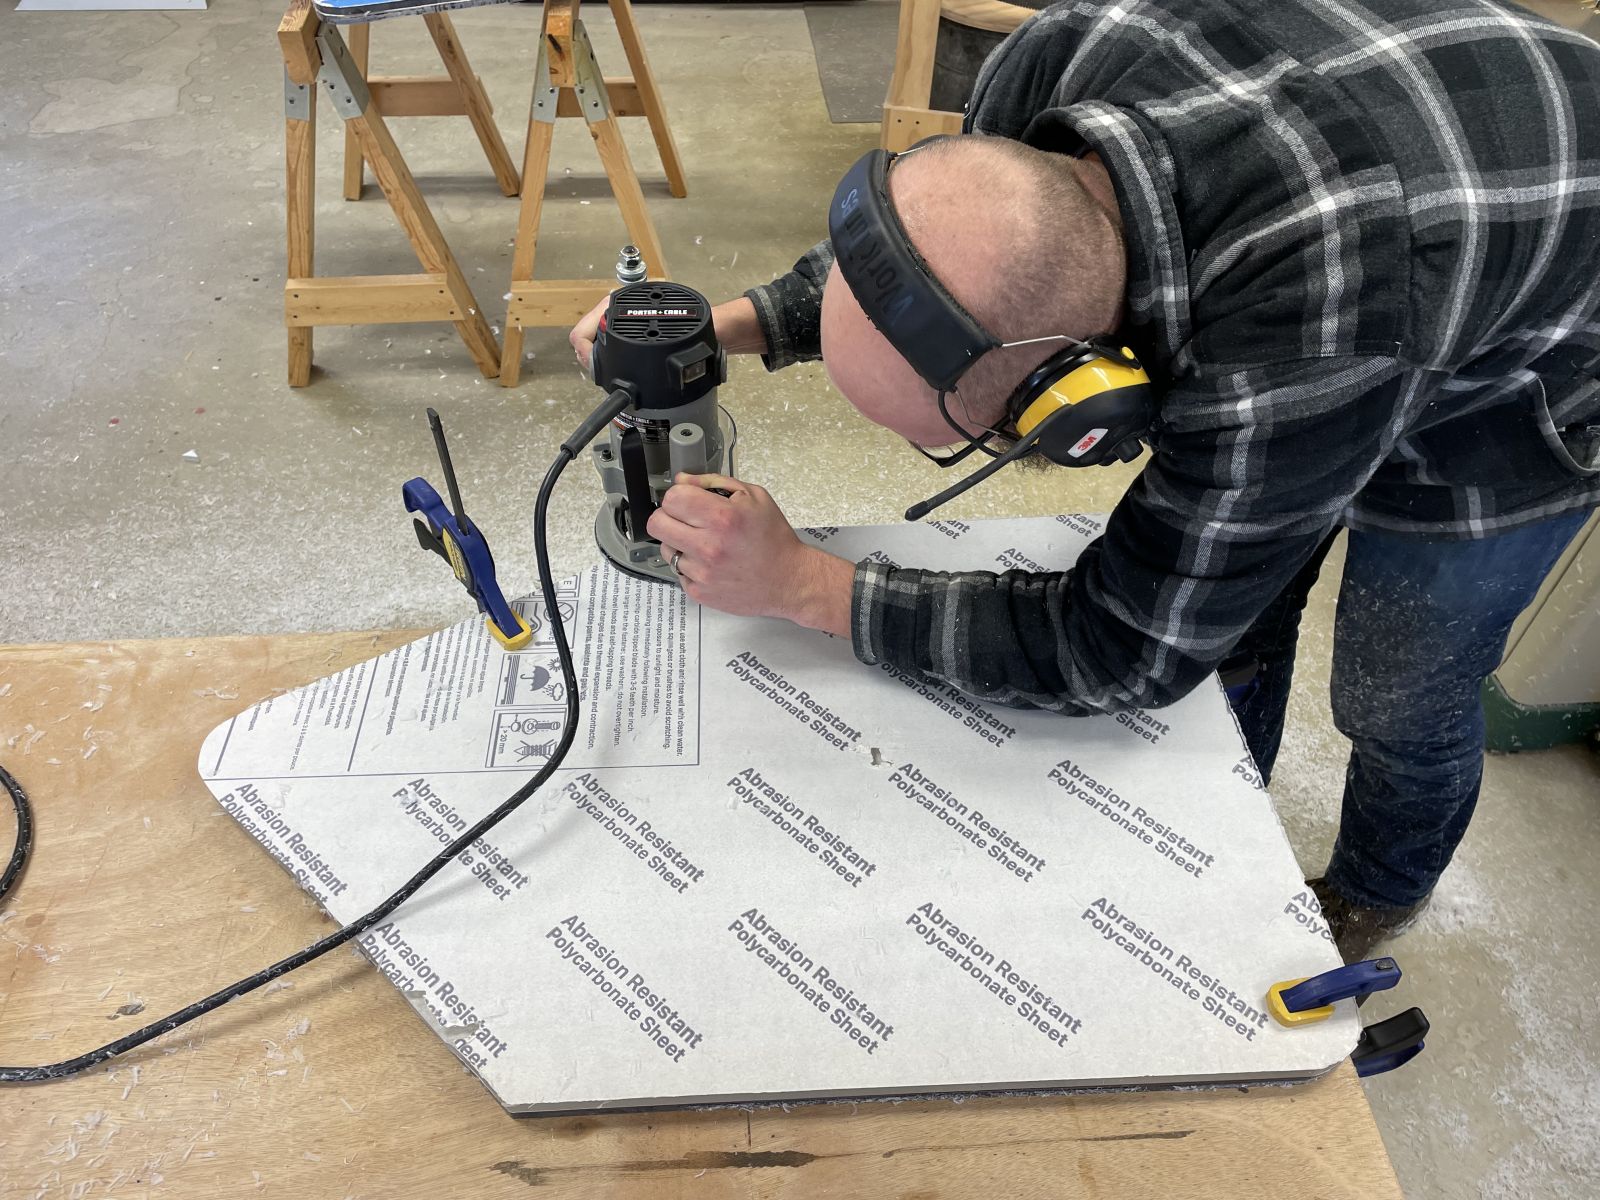
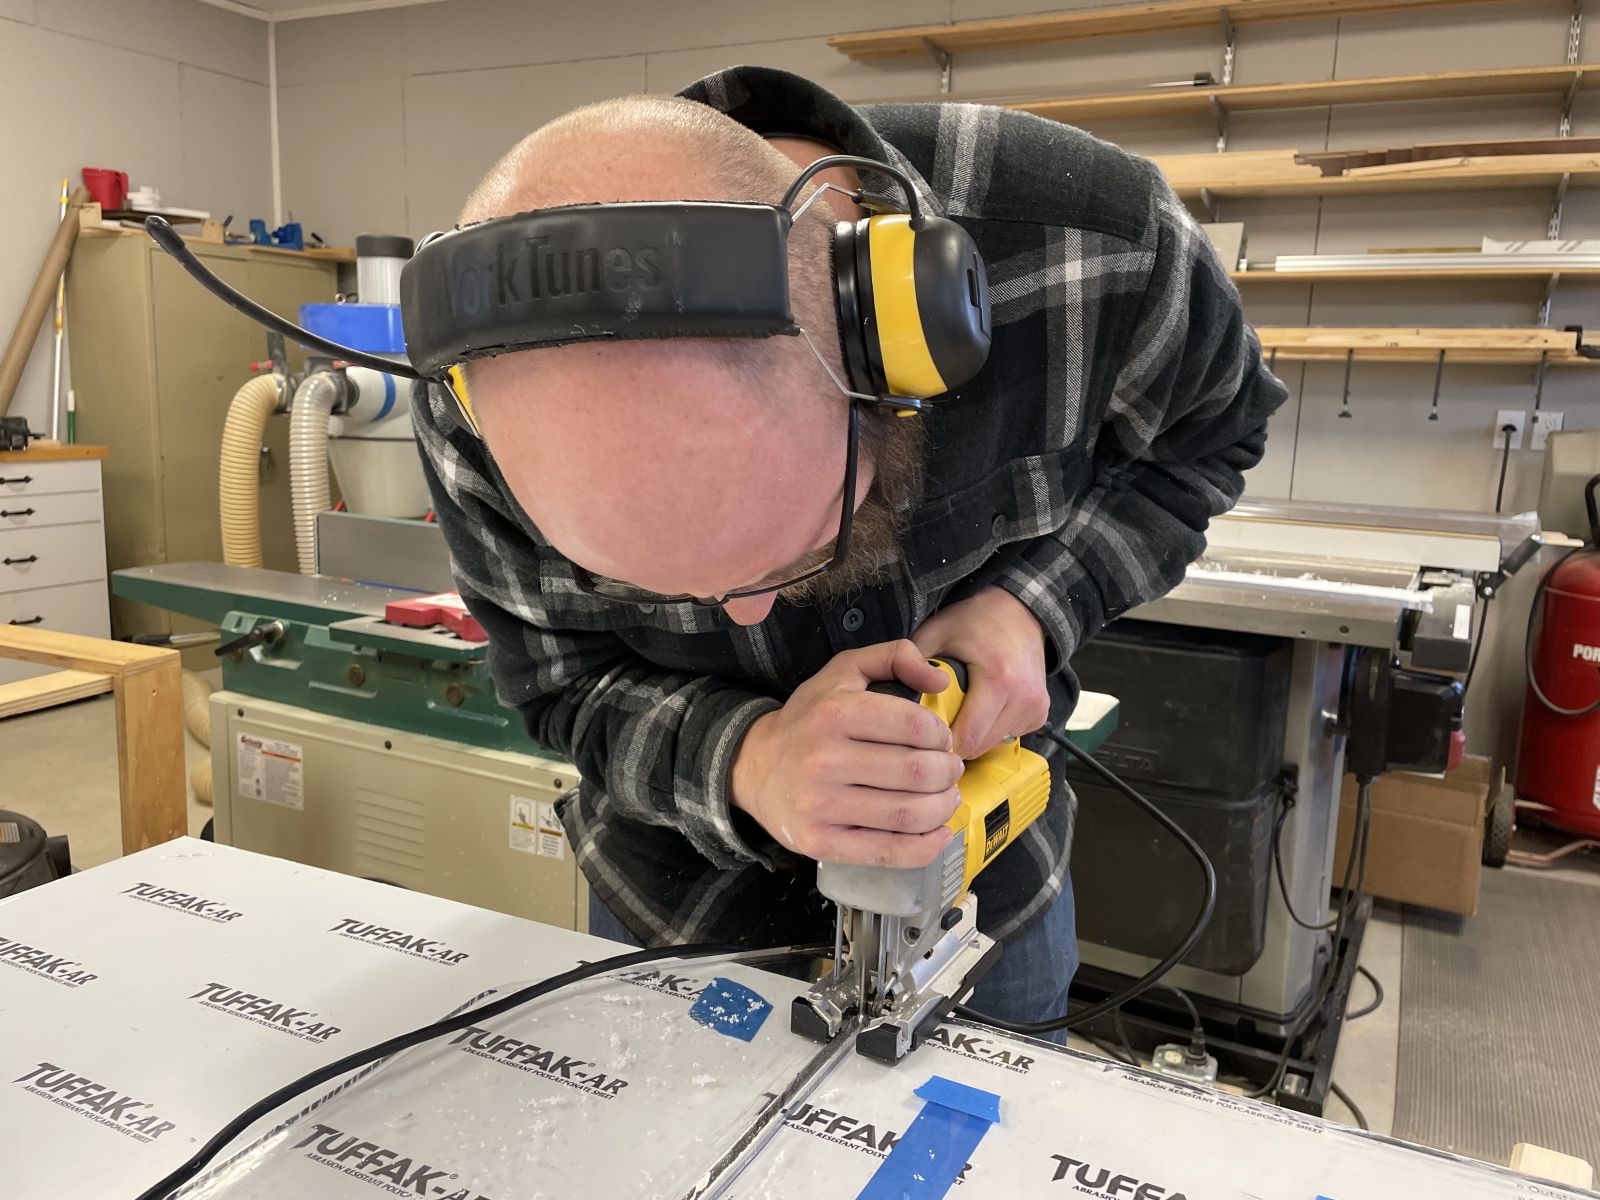
Use the original windows directly as templates, attach them to the new material with the “painter’s tape and CA glue” trick, cut the new window using a sharp wood cutting blade in a jigsaw, clean up the edges with one pass with a flush trim router bit
Use the original windows directly as templates, attach them to the new material with the double sided CNC tape, cut the new window using a sharp wood cutting blade in a jigsaw, clean up the edges with one pass with a flush trim router bit
We did have to return to plywood templates for a few of the windows when Lucas and Emily determined that replacements for some of the original windows could be made to better fit their fiberglass openings.
Lucas and Emily graciously left several rolls of the CNC woodworking tape for me to use on the CNC router!
Lots of flush trimming …
More flush trimming …
Efficiency was gained by leaving a minimal amount of material to be trimmed in the next operation
Rough cutting with custom plywood templates attached
Lucas cleaning up the edges against the template with a flush trimming router bit
Emily applying drops of CA glue to attach an original window to the new material
Emily and Lucas planning the cutting strategy for a combination of windows
We discovered that a sharp wood cutting blade in the jigsaw cut the 1/2″ polycarbonate quickly and left a smooth edge
Lucas rough cutting outside of the attached template with the jigsaw
Kyle stopped by the shop to lend Lucas and Emily a hand


 stuck the pattern to each blank for refining with a flush trim bit on the router table")


")


")


")